Bridging assets to Layer 2 (L2) networks via Ledger Live enables you to move your cryptocurrency from a Layer 1 (L1) blockchain (like Ethereum mainnet) to a more scalable and cost-efficient L2 network (e.g., Polygon, Arbitrum, or Base) while maintaining the security of your Ledger hardware wallet (Nano S Plus, Nano X, Flex, or Stax).
Although Ledger Live does not natively support direct bridging for all L2 networks as of February 22, 2025, it facilitates secure asset management and integrates with third-party tools or services to accomplish this.
Please download the last update of Ledger Live Application:
1. Ledger Live for Windows 10/11
2. Ledger Live for MAC
3. Ledger Live for Android
Below is a step-by-step guide on how to bridge assets to L2 networks using Ledger Live, with a focus on safety and practicality.
What Is Bridging?
- Definition: Bridging involves transferring assets from one blockchain (e.g., Ethereum L1) to another (e.g., Polygon L2) via a smart contract mechanism. The original assets are locked on L1, and equivalent tokens are minted on L2 (or vice versa).
- Purpose: Access lower fees, faster transactions, and L2-specific dApps (e.g., DeFi, NFTs) while leveraging your Ledger’s offline security.
- Ledger Live’s Role: It doesn’t directly bridge assets for most L2s but supports managing bridged assets (e.g., ETH on Base) and integrates with external bridges or dApps.
Supported L2 Networks in Ledger Live
- Ledger Live natively supports some L2 networks for basic asset management (sending/receiving):
- Polygon (POL): Fully integrated—send, receive, and stake POL/MATIC.
- Base: Supported since 2023—manage ETH on Coinbase’s L2.
- Others (Partial Support): Arbitrum, Optimism—visible via Ethereum accounts, but bridging requires external tools.
- For full L2 bridging, you’ll often need third-party services (e.g., bridges or dApps).
Step-by-Step Guide to Bridging Assets
Step 1: Prepare Your Ledger and Ledger Live
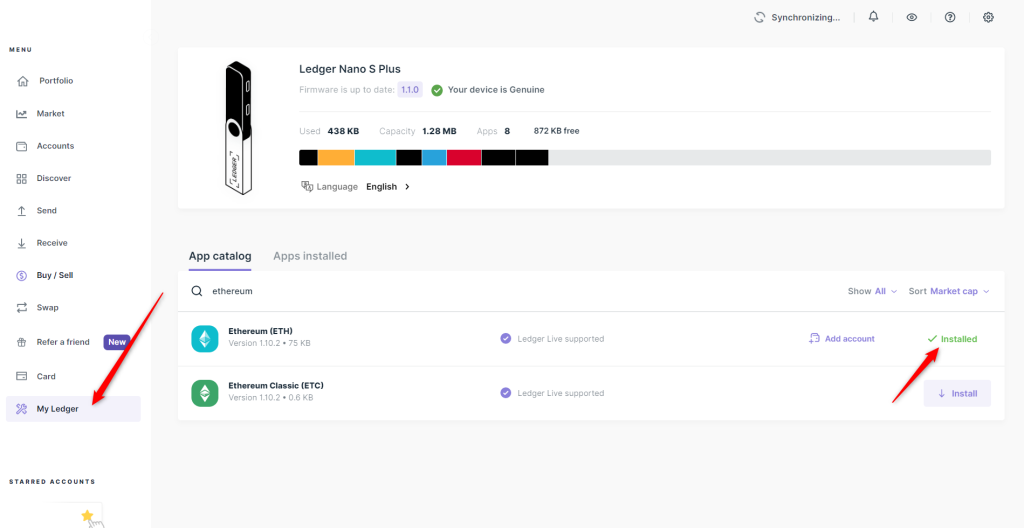
- Update Software:
- Ensure Ledger Live is the latest version (e.g., 2.81.0) from ledger.com/ledger-live (see “How to Update Ledger Live”).
- Update your Ledger firmware (My Ledger > Firmware, e.g., Nano X 2.2.1)—approve on-device.
- Set Up L1 Account:
- Open Ledger Live, go to Accounts > Add Account, select your L1 blockchain (e.g., “Ethereum”).
- Install the app (e.g., Ethereum app) via My Ledger—approve on-device.
- Fund it with assets (e.g., ETH) via Receive—verify the address on your Ledger.
- Add L2 Account (If Supported):
- For Polygon/Base: Accounts > Add Account > Polygon/Base, install the app if needed, sync.
Step 2: Identify Your Bridging Method
- Native Bridging (Limited):
- Ledger Live doesn’t offer a universal “Bridge” button for most L2s. Polygon has partial native support via its bridge, but it’s not fully in-app.
- Third-Party Bridges: Use trusted bridges compatible with Ledger:
- Polygon Bridge: bridge.polygon.technology (Ethereum
Polygon).
- Arbitrum Bridge: bridge.arbitrum.io.
- Optimism Bridge: app.optimism.io/bridge.
- Base Bridge: bridge.base.org (Ethereum
- Cross-Chain Options: Rhino.fi, Across Protocol, Hop Exchange.
- Polygon Bridge: bridge.polygon.technology (Ethereum
- dApp Integration: Use WalletConnect or MetaMask with your Ledger for dApps that bridge assets.
Step 3: Bridge via WalletConnect (Ledger Live Native)
- Access WalletConnect:
- In Ledger Live, go to Accounts > Ethereum > WalletConnect.
- Connect to Bridge:
- Open a bridge site (e.g., bridge.arbitrum.io), click Connect Wallet > WalletConnect—get a QR code.
- Desktop: Paste the QR into Ledger Live’s WalletConnect window.
- Mobile: Scan with Ledger Live mobile.
- Initiate Bridging:
- Select source (Ethereum) and destination (Arbitrum).
- Enter amount (e.g., 0.1 ETH)—ensure extra ETH for gas.
- Approve connection on your Ledger (open Ethereum app).
- Sign Transaction:
- Ledger shows “Contract: [address]”, “Amount: 0.1 ETH”—verify, approve on-device.
- Wait: Bridging takes 5–15 minutes (or hours for withdrawals to L1)—track on the bridge’s UI.
Step 4: Bridge via MetaMask (Broader Flexibility)
- Set Up MetaMask:
- Install from metamask.io, connect your Ledger (Connect Hardware Wallet > Ledger).
- Open the Ethereum app, select your address (e.g., 0x123…).
- Add L2 Network:
- In MetaMask, add the L2 network manually (e.g., Arbitrum: RPC URL https://arb1.arbitrum.io/rpc, Chain ID 42161—find details on chainlist.org).
- Bridge Assets:
- Go to bridge.arbitrum.io, connect MetaMask.
- Deposit 0.1 ETH—approve on Ledger (e.g., “Bridge 0.1 ETH to Arbitrum”).
- Switch Networks: In MetaMask, switch to Arbitrum—assets appear.
Step 5: Verify Assets in Ledger Live
- Native L2s: For Polygon/Base, go to Accounts > Polygon/Base—see your bridged assets (e.g., 0.1 ETH on Base).
- Non-Native L2s: Assets on Arbitrum/Optimism won’t show directly—use MetaMask or explorers (e.g., arbiscan.io) with your Ledger address.
- LP Tokens/NFTs: If bridged assets include ERC-20s or NFTs, check Accounts > Ethereum > Tokens/NFTs—may require manual addition.
Security Best Practices
- Verify Bridge: Use official URLs (e.g., bridge.polygon.technology)—avoid phishing scams (see “Avoiding Phishing Scams”).
- Never Share Seed: Your 24-word phrase stays on your Ledger—don’t enter it anywhere (see “Why Never Share Your Seed”).
- Check Contracts: Confirm bridge contract addresses (e.g., Polygon Bridge: 0x40ec5…) on official docs or etherscan.io—avoid unknowns.
- Sign Safely: Verify details on your Ledger’s screen (amount, destination)—prevents malware swaps (see “Verifying Transactions”).
- Test Small: Bridge 0.01 ETH first—ensure it arrives before larger amounts.
- Gas Funds: Keep extra ETH on L1 for fees—bridging costs $5–$20 (L1 → L2) or pennies (L2 → L2).
Example: Bridging ETH to Polygon
- Setup: Ethereum account in Ledger Live with 0.2 ETH.
- Bridge: Via bridge.polygon.technology with MetaMask + Ledger.
- Connect MetaMask, select “ETH”, deposit 0.1 ETH.
- Approve on Nano X: “Contract: 0x40ec5…”, “Amount: 0.1 ETH”.
- Result: 0.1 ETH appears in Accounts > Polygon after ~10 minutes.
Troubleshooting
- Assets Not Showing: Switch networks in MetaMask or resync Ledger Live (Accounts > Clear Cache)—check explorers.
- Transaction Stuck: Increase gas on L1—monitor on etherscan.io.
- Bridge Fails: Ensure sufficient ETH for fees—retry with official bridge.
Conclusion
Bridging assets to L2 networks via Ledger Live involves using your Ledger with external bridges (e.g., Polygon Bridge, Arbitrum Bridge) through WalletConnect or MetaMask, as native bridging is limited. Your Ledger ensures every step is signed securely offline, protecting your funds during the transfer. Verify bridges, test small, and monitor arrivals—your assets will thrive on L2’s low fees and speed.